Back in September, CNCF announced a new certification called Istio Certified Associate (ICA).
Like any other certification, the purpose of ICA is to validate your knowledge of Istio. It is a great way to show your current or future employer you have the skills and expertise to work with Istio.
You can already purchase the certification exam, but you will be able to take it in November 2023, so keep this in mind as you read this blog post.
Note
Even though I was the one who created the first Istio certification back in 2021, I don't have any knowledge or inside information on what's in this CNCF exam; my guess on what's in the exam is as good as yours.
CNCF publishes an exam curriculum, so we have a high-level idea of different topics that one should review and prepare for. For actual details about the exam, make sure you read the information on the frequently asked questions page and the ICA exam page.
As we saw the news, we (my coworkers Marino, Alessandro, and me) decided to create a series of live streams called Mesh Week. The idea behind these sessions was that anyone interested in Istio and preparing for the Istio Certified Associate exam can use them.
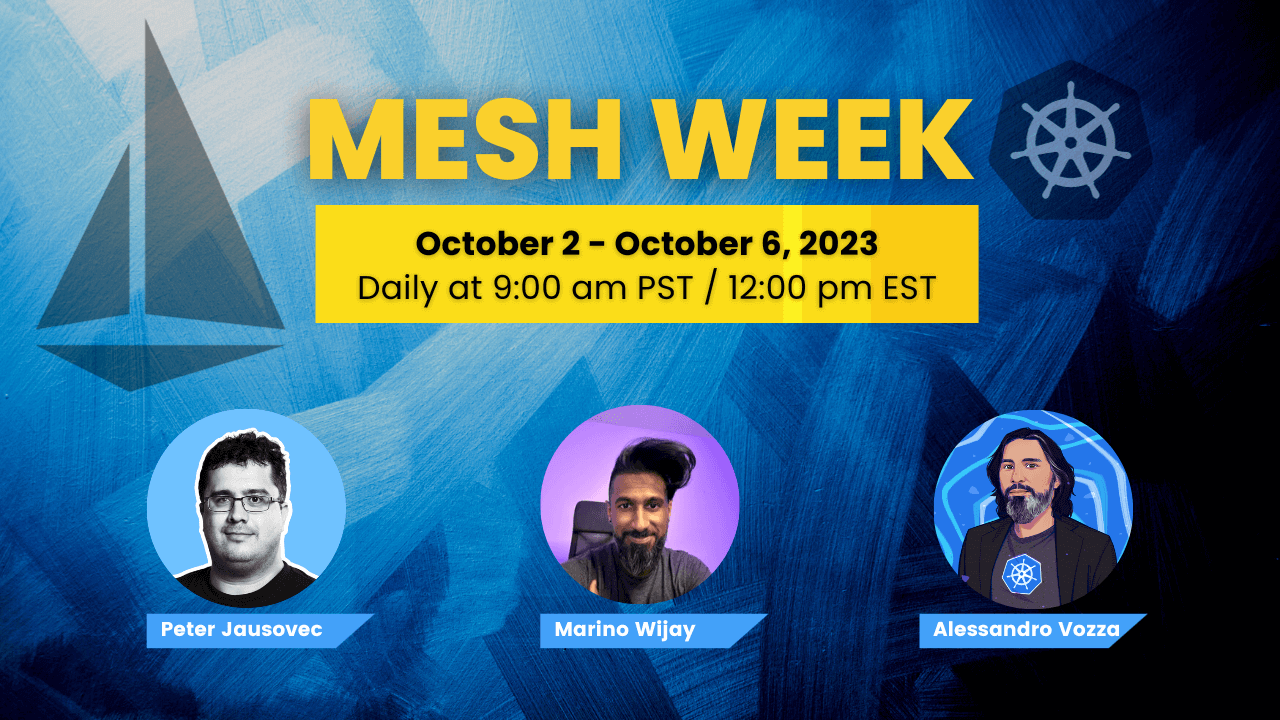
We did five live streams, going through the curriculum and covering the following topics:
- Istio installation, upgrade and configuration (Watch on YouTube)
- Istio traffic management (Watch on YouTube)
- Istio resiliency and fault injection (Watch on YouTube)
- Security in Istio and securing workloads (Watch on YouTube)
- Advanced scenarios and troubleshooting Istio (Watch on YouTube)
Here are my notes, tips, and observations from these sessions.
Understanding IstioOperator resource
If there were only one thing to take away from the Istio installation session, it would be understanding different configuration pieces and where to configure them.
Here's a sample IstioOperator resource that shows you the sections and points to reference documentation:
apiVersion: install.istio.io/v1alpha1
# Reference: https://istio.io/latest/docs/reference/config/istio.operator.v1alpha1
kind: IstioOperator
spec:
  # Configuration profile used as the base for installation
  # Other settings you can configure at this level are namespace, hub, revision, tag
  profile: demo

  # Mesh configuration settings: https://istio.io/latest/docs/reference/config/istio.mesh.v1alpha1
  meshConfig:
    accessLogFile: /dev/stdout

  # Individual components you can configure: https://istio.io/latest/docs/reference/config/istio.operator.v1alpha1/#IstioComponentSetSpec
  # Includes base, pilot, cni, ztunnel, ingressGateways, egressGateways, istiodRemote
  components:
    # pilot: ...
    # cni: ...
    egressGateways:
      # Note that there can be more than one egress/ingress gateway instance.
      # To customize a gateway that already is part of the selected profile (E.g., demo in this case)
      # make sure you use the default gateway name
      - name: istio-egressgateway
        # This disables the default egress gateway (i.e., we won't deploy it)
        enabled: false
    ingressGateways:
      # Disable the default ingress gateway
      - name: istio-ingressgateway
        enabled: false
      # Enable a new gateway
      - name: peters-gateway
        enabled: true
        namespace: my-custom-namespace
        label:
          app: my-label
        # Customize the k8s resources: https://istio.io/latest/docs/reference/config/istio.operator.v1alpha1/#KubernetesResourcesSpec
        k8s:
          resources:
            requests:
              cpu: 5m
              memory: 20Mi
How traffic comes into the cluster
Using the Gateway resource (that configures the ingress/egress gateway (the actual pod)) and a combination of a hostname (e.g.,
hello.com) and a port (80). These two things "tell" the ingress pod to "listen" for that hostname and port.How to expose services through the Gateway
The routing rules that "tell" Istio where to route the traffic are all in the VirtualService. To expose a Kubernetes service through the Gateway, you attach the gateway to the VirtualService. The Gateway only defines the ports, host names, and TLS configuration you want the gateway to listen on, while the VirtualService defines the routing rules.
How to match the traffic
You can match the traffic on URI paths, headers, query parameters, gateways, etc... The matching acts similarly to the "if-else" statements where the "if" portion is applied if the match is true, otherwise the remaining rules get processed. In most cases, you can match the values exactly, by prefix, or using a Regex.
Difference between VirtualService and DestinationRule
In VirtualService, you match the traffic, define where it gets routed, add/remove headers if needed, while with the DestinationRule, you control the configuration on the endpoints (i.e., collection of target pod IPs) side. I.e., you can control the load-balancing algorithm to be used when selecting one of the destinations, TLS configuration, circuit breakers, etc.
Splitting traffic between multiple services/versions/etc.
You'll have a single Kubernetes Service and one or more Deployments (e.g.,
v1, v2 deployment). The Service uses a generic label that selects pods from both deployments (e.g. app=helloworld), while the pods from the versioned deployments also have the version=v1 or version=v2 labels.Note
Replace theversionlabels with whatever you like, want, or need.
To tell Istio about these different versions, you create named subsets in the DestinationRule. Then, to route to one or the other subset, you reference it in the VirtualService.
The way this works behind the scenes (i.e., Envoy) is that there are different clusters (an Envoy concept) configured for each subset. For example, a cluster named
...|8080|v1|httpbin... and ...|8080|v2|httpbin... and so on. Note the subset names in the string -- this tells Envoy which endpoints (one cluster in Envoy can have multiple endpoints (i.e., hosts, i.e., pod IPs)) to make part of the v2 cluster or part of the v1 cluster and so on. Then, when the matching occurs, and traffic gets routed to one or the other, Envoy points the traffic to one of the pre-defined clusters with the endpoints that are part of that subset.I've explained how this works with a demo here.
Where are resiliency and fault injection features configured?
Any timeouts, retries, and fault injection is configured in the VirtualService resource. While things like circuit breakers and outlier detection are configured in the DestinationRule.
What is the difference between authentication and authorization?
In the security stream, we talked about the difference between authentication ("Is a credential valid and trusted?") and authorization ("Is a validated credential allowed to perform an action on an object?").
We also introduced the resources in Istio that manage authentication and authorization.
What can I do with PeerAuthentication and RequestAuthentication resources?
The two resources that deal with authentication in Istio are the PeerAuthentication and the RequestAuthentication. The former deals with services, while the latter deals with users and end-user authentication.
The "result" of both resources is either a
principal (PeerAuthentication, service) or a requestPrincipal (RequestAuthentication, user). These two values, along with IP blocks, namespaces, claims, etc., can be used to create authorization policies in the AuthorizationPolicy resource (specifically in the rules section).You can use the AuthorizationPolicy to configure and define the following:
- Which workloads are we applying the policy to? (can be a set of workloads (e.g., using labels), a namespace, or even mesh-wide)
- What is the action? Are we denying (DENY) the requests or allowing (ALLOW) them?
- The actual rules that get evaluated. These get split into three sections:
- From (
from): where are the requests coming from (e.g., namespace, principal, request principal) - To (
to): what are the operations we want to apply the action to (e.g., "GET request on /api/blah", "POST and DELETE requests on /hello/*", ...) - When (
when): conditions when to apply the rule (e.g., "When the issuer of the JWT token == "someone")
- From (
The nice thing about the AuthorizationPolicy is that you can combine rules involving services and end-users. For example, you can allow all requests from the
default namespace only if the request contains a valid JWT token and the user claim equals ricky.Conclusion
Thanks to everyone who showed up and said Hello during the live streams. I hope you found them helpful and that you learned something new. If you decide to take on the Istio Certified Associate, let me know how it goes!
You can watch all streams on Learn Cloud Native YouTube channel.