One part of the
Start Kubernetes course I am working on (in addition to the book and videos) is the interactive labs. The purpose of these labs is to help you learn Kubernetes by solving different tasks, such as creating pods, scaling deployments, and so on. What follows is a quick explanation of how the end-user experience looks like.
Start Kubernetes Labs Experience
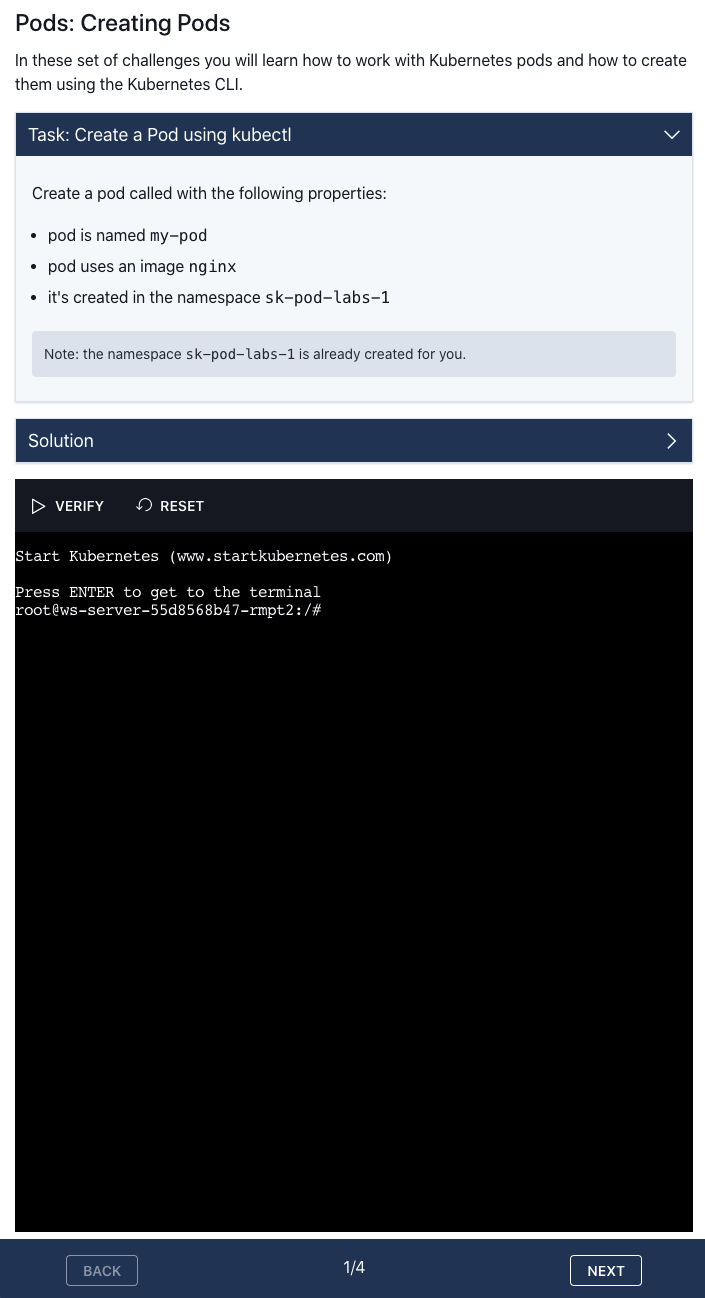
Each task has a set of instructions and requirements. For example, here's how the web page looks like for one of the tasks in the Pods section:
The top part of the page explains what the task is and what you need to accomplish (e.g. create a Kubernetes Pod with a specific name and image).
The bottom portion is the actual terminal window where you can interact with your Kubernetes cluster. From this terminal, you have access to the Kubernetes CLI and other tools and commands you might need to solve the tasks.
To solve the task from the screenshot above you need to create a new Pod with the specified name and image. Once you do that you can click the VERIFY button - this will run the verification and make sure you completed the task correctly. In this case, it checks that the pod with the specified name is created, it uses the correct image and it is deployed in the correct namespace.
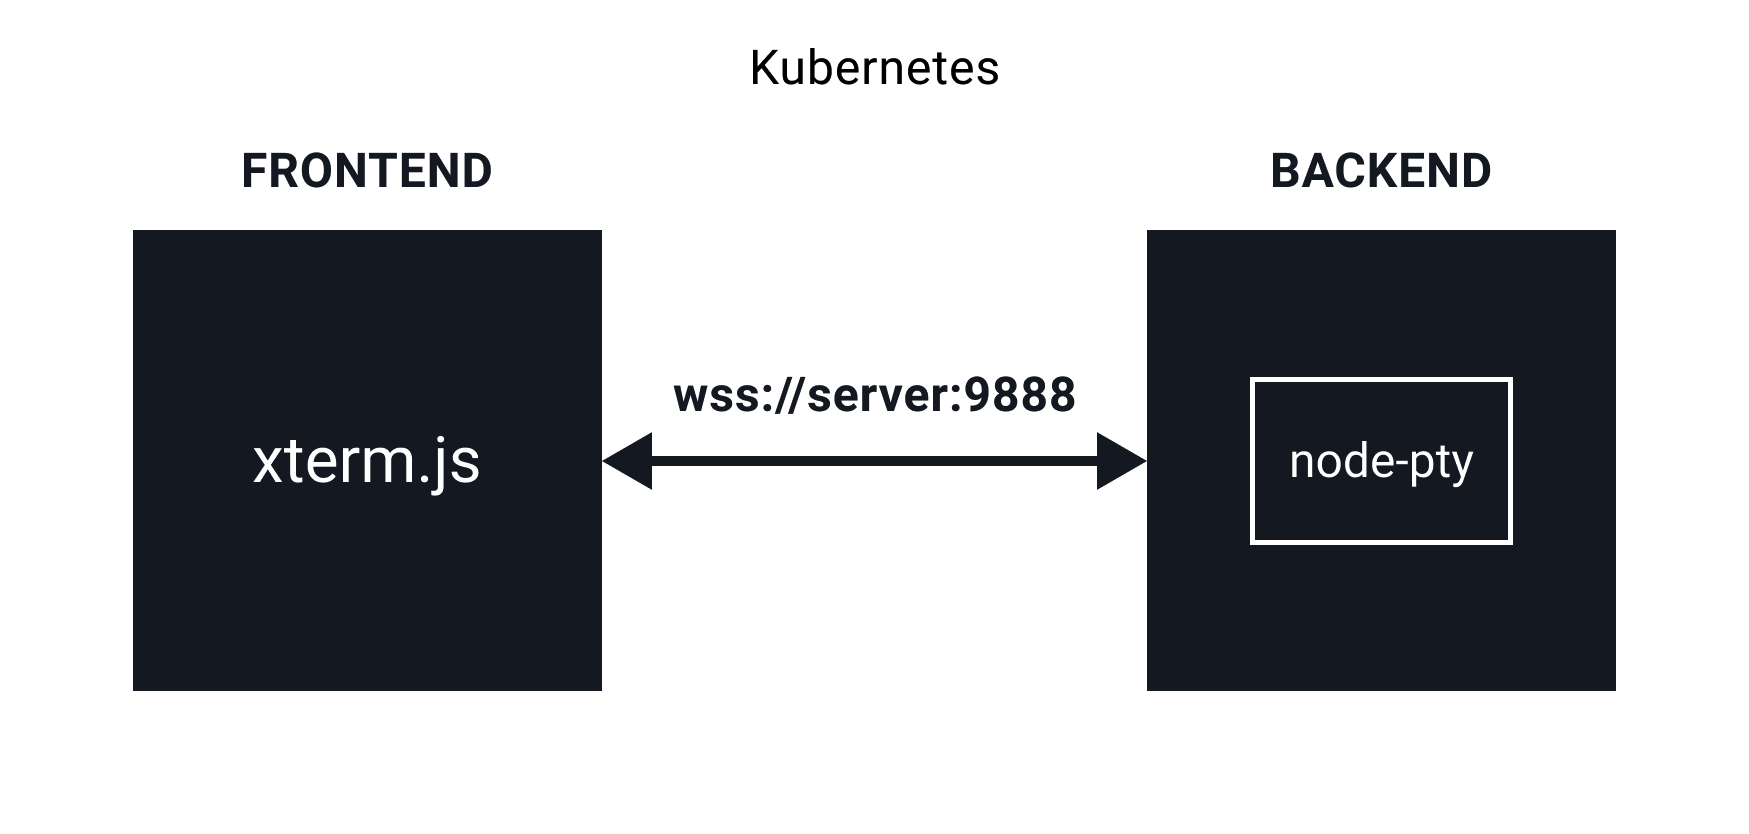
At the moment there are two pieces that make up the solution: the web frontend and the backend that runs the terminal I connect to from the frontend.\
Frontend
For the frontend, I picked
TypeScript and
React. I have been using Typescript for the past couple of months and I really like it. If you're coming from the Javascript world, it does take a bit to get used to it, but the switch is definitely worth it. Typescript is nothing but Javascript, but it has additional features on top - stuff like types, static typing, and generics.
Like with my other projects, I am using
Tailwind CSS. I still think I am 'wasting' way too much time playing with the design, but with Tailwind, I am at least constrained in terms of which colors to use, uniform margins/padding etc. And before anyone says something, yes, I know, you can overwrite and customize Tailwind to include whatever you want, but I am fine with the defaults at the moment.
Backend
On the backend, I am using
Typescript and
Express. I am creating an instance of the pseudo-terminal (
node-pty) and connecting to it using a web socket and the
AttachAddon for xterm.js. When initializing the attach addon, you can pass in the web socket. That creates the connection from the terminal UI in the frontend to the pseudo-terminal running on the backend.
The backend code is fairly straightforward at the moment. The pseudo-terminal listens on the data event and sends the data through the web socket back to the frontend. Similarly, whenever there's a message on the web socket (coming from the frontend), the data gets sent to the pseudo-terminal.
This means that I am actually getting a terminal inside of the Docker image where the backend is running. It's far from perfect, but it is a start. A much better solution would be to run a separate container whenever a terminal is requested.
Since everything is running inside a Kubernetes cluster, the terminal that gets initialized in the backend container has access to the cluster. Note that this is not in any way secure and it is only meant to be running in your local cluster. There are ways to isolate the terminal user to be only able to execute certain commands or have access to a single cluster etc.
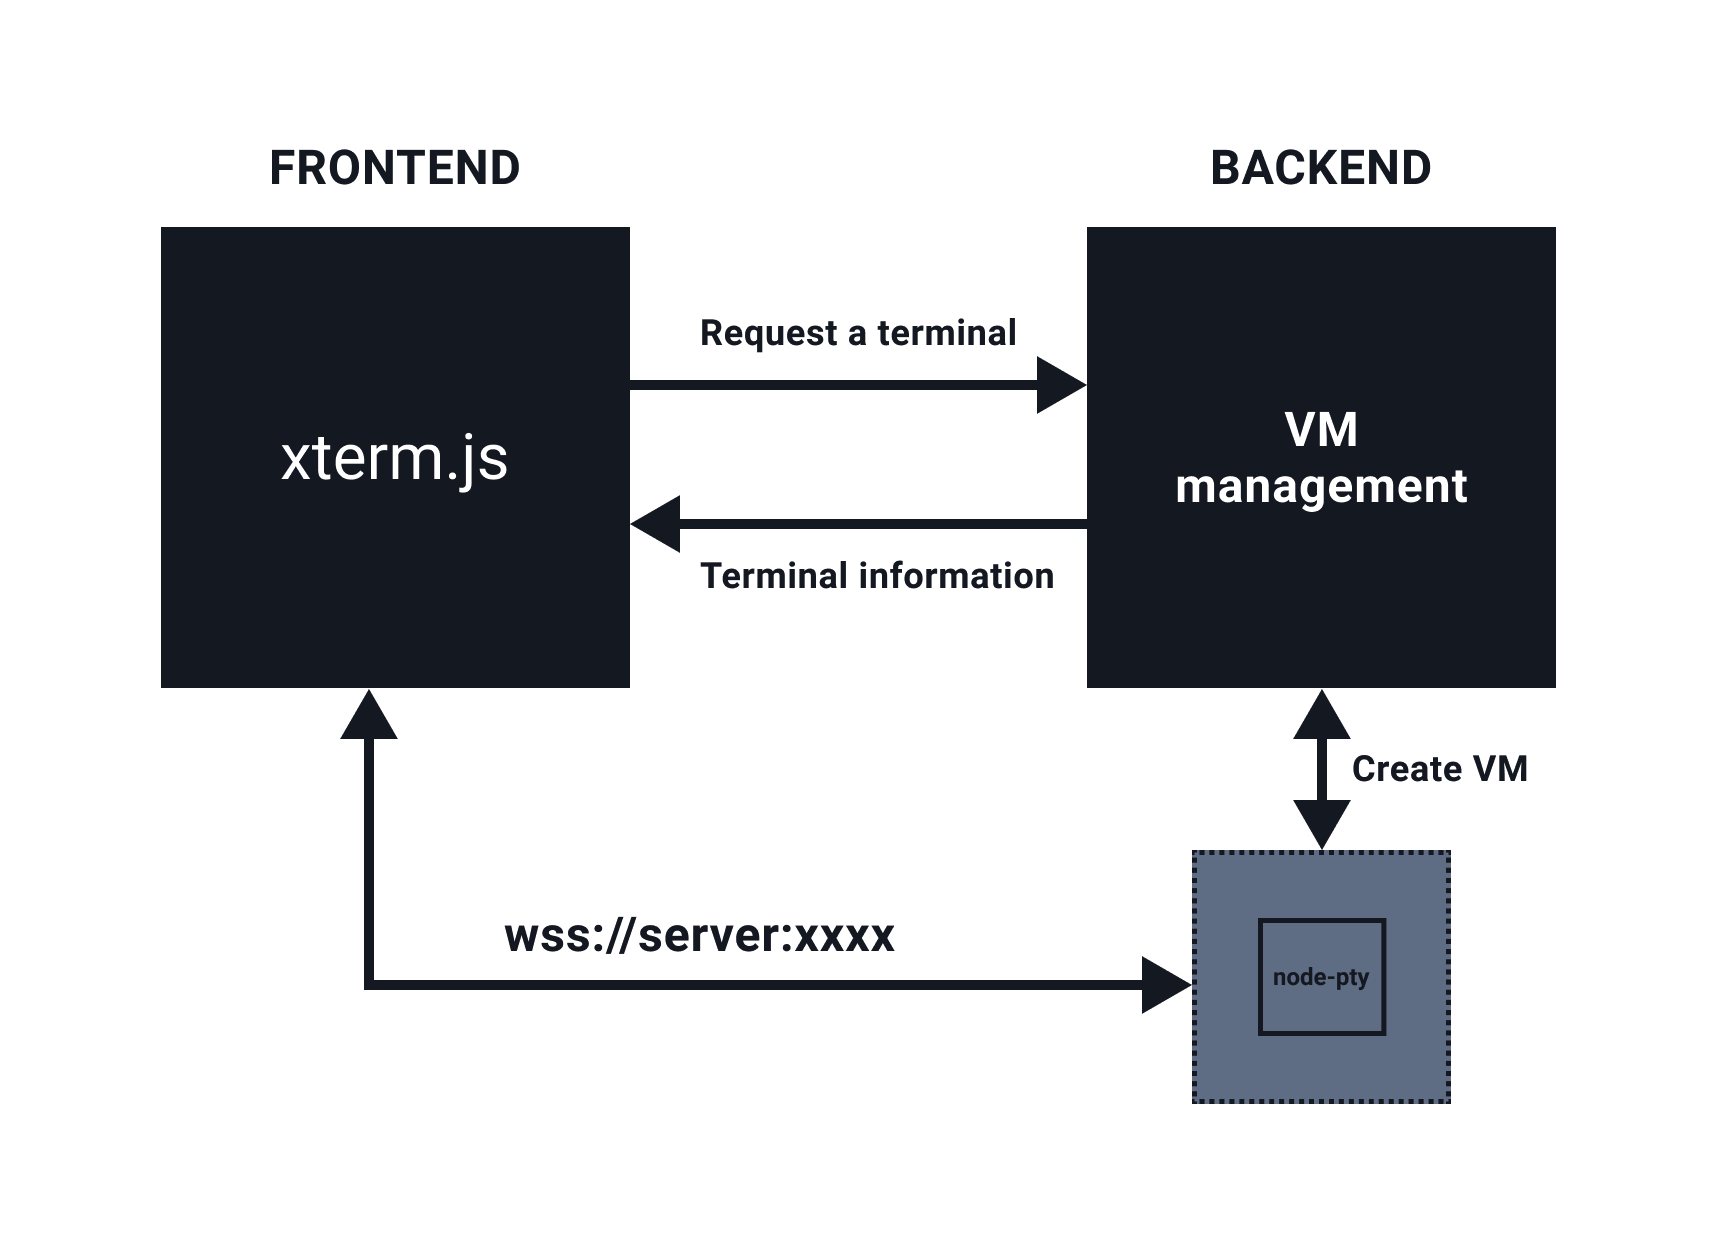
An even better solution would be to isolate the terminals from everything. That means that the frontend and backend don't have to run inside Kubernetes at all. Whenever a terminal is requested a new VM could be allocated by the backend. This would allow for complete separation of everything. Even if a malicious actor gets access to the VM, they don't have access to anything else and the VM gets terminated.
Here's a quick diagram on how this could work (it's probably way more complicated than it looks like):
The logic for VM management would have to be smart. You could probably keep a pool for VMs that are ready to go, so you can just turn them on, send back the VM information, and users can connect to the terminal. The upside with this approach is that you could have different VM images prepared (with different stuff installed on them), you can bring up multiple VMs and simulate more complex scenarios etc. However, the downside is that it is way more complex to implement and it costs $$ to keep a pool of VMs running. It would definitely be an interesting solution to implement.
Dev Environment Setup
Back to the real world and my local environment setup. As mentioned previously I am running both components (frontend and backend) in the Kubernetes cluster. I could have run both of them just locally, outside of the cluster - the terminal that would get allocated would be on my local machine, thus it would have access to the local cluster. However, I wanted to develop this in the same way it would be running when installed - i.e. everything inside of the cluster.
I am using
Skaffold to automatically detect the source code changes in both components, rebuild the images, and update the deployments/pods in the cluster. At first, I was a bit skeptical that it would take too long, but I must say it doesn't feel like it's too slow to refresh/rebuild.
Docker files
To set it up, I started with the Docker images for both projects. In both cases, the Dockerfiles were 'development' Docker files. That means I am running
nodemon for the server project and the default
react-scripts start for the frontend.
Here's how the Dockerfile for the React frontend looks like:
FROM node:alpine

WORKDIR /app
EXPOSE 3000
CMD ["npm", "run", "start"]
ENV CI=true
COPY package* ./
RUN npm ci
COPY . .
Kubernetes Deployment files
The next step was to create the Kubernetes YAML files for both projects. There's nothing special in the YAML files - they are just Deployments that reference an image name (e.g. startkubernetes-web or ws-server) and define the ports both applications are available on.
With these files created, you can run skaffold init. Skaffold automatically scans for Dockerfiles and Kubernetes YAML files and asks you the questions to figure out which Dockerfile to use for the image referenced in the Kubernetes YAML files.
Once that's determined it creates a Skaffold configuration file in skaffold.yaml. This is how the Skaffold configuration file looks like:
apiVersion: skaffold/v2beta5
kind: Config
metadata:
  name: startkubernetes-labs
build:
  artifacts:
    - image: startkubernetes-web
      context: web
    - image: ws-server
      context: server
deploy:
  kubectl:
    manifests:
      - server/k8s/deployment.yaml
      - web/k8s/deployment.yaml
In the section under the build key you notice the image names (from the YAML files) and the contexts (folders) to use to build these images. Similarly, the deploy section lists the manifests to deploy using Kubernetes CLI (kubectl).
Now you can run skaffold dev to enter the development mode. The dev command builds the images and deploy the manifests to Kubernetes. Running the kubectl get pods shows you the running pods:
$ kubectl get po
NAME                        READY   STATUS    RESTARTS   AGE
web-649574c5cc-snp9n        1/1     Running   0          49s
ws-server-97f8d9f5d-qtkrg   1/1     Running   0          50s
There are a couple of things missing though. First, since we are running both components in dev mode (i.e. automatic refresh/rebuild) we need to tell Skaffold to sync the changed files to the containers, so the rebuild/reload is triggered. Second, we can't access the components as they are not exposed anywhere. We also need to tell Skaffold to expose them somehow.
File sync
Skaffold supports copying changed files to the container, without rebuilding it. Whenever you can avoid rebuilding an image is a good thing as you are saving a lot of time.
The files you want to sync can be specified under the build key in the Skaffold configuration file like this:
build:
  artifacts:
    - image: startkubernetes-web
      context: ./web
      sync:
        infer:
          - '**/*.ts'
          - '**/*.tsx'
          - '**/*.css'
    - image: ws-server
      context: ./server
      sync:
        infer:
          - '**/*.ts'
Notice the matching pattern monitors for all .ts, .tsx and .css files. Whenever any file that matches that pattern changes, Skaffold will sync the files over to the running container and nodemon/React scripts will detect the changes and reload accordingly.
Exposing ports
The second thing to solve is exposing ports and getting access to the services. This can be defined in the port forward section of the Skaffold configuration file. You define the resource type (e.g. Deployment or Service), resource name, and the port number. Skaffold does the rest and ensures that those services get exposed.
portForward:
  - resourceType: deployment
    resourceName: web
    port: 3000
  - resourceType: service
    resourceName: ws-server
    port: 8999
Now if you run the skaffold dev --port-forward the Skaffold will rebuild what's needed and set up the port forward based on the configuration. Here's the sample output of the port forward:
Port forwarding deployment/web in namespace default, remote port 3000 -> address 127.0.0.1 port 3000
Port forwarding service/ws-server in namespace default, remote port 8999 -> address 127.0.0.1 port 8999
Conclusion
If you are doing any development for Kubernetes, where you need to run your applications inside the cluster, make sure you take a look at Skaffold. It makes everything so much easier. You don't need to worry about rebuilding images, syncing files and re-deploying - it is done all for you.
If you liked this article you will definitely like my new course called
Start Kubernetes. This course includes everything I know about Kubernetes in an ebook, set of videos and practial labs.
If you are interested in more articles and topics like this one, make sure you sign up for my
newsletter.


![Top Cloud-Native Certifications and Learning Resources [2023]](/_next/image?url=%2Ftimgs%2F2022-07-26-certs.png&w=3840&q=75)
